Showing posts with label DIY. Show all posts

Monday, 8 June 2015

Behind the magic!

Everyone wants to be a princess!


So this weekend was THE weekend I got to dress up as Rapunzel again! My awesome friend had a Disney themed 30th birthday party so we all made a big effort with our outfits! I’ve been Rapunzel before but I wanted to do the flower plait hair this time. Everyone loved it and it was actually quite easy to do. If you fancy having a go yourself – read on!

What do you need?
  • I used two and a half sets of clip in extensions but the half was for the plait detail so two is enough if that’s easier/cheaper!
  • extra clips to go on the top clip in section, just so there’s more to hold on to your hair. I didn’t feel the usual 4-5 was enough.
  • Bobbles and grips! Lots of grips! I used one normal bobble to secure the second set of clip ins to the top. Some clear thin bobbles to tie the small plaits at the end
  • Artificial flowers/Paper flowers. I do have lots hanging around in my studio so I didn’t need to buy any in. You can get cheap daisies from eBay and the rest of the flowers were from cheap corner shops.
  • I also used some fabric glue and florist wire to add the smaller flowers and wrap around the hair to secure or add on to a grip.


I have a box full of different blonde clip in extensions so I had a few to work with. I washed them up as these were older ones. I usually use a fabric conditioner to wash them as they aren’t human hair (also makes them smell amazing!)
I wasn’t sure how many I was going to use. I only ended up using two, it was already getting pretty heavy at that point anyway!


For the plaits I cut off a strip of hair with the clip on and plaited it. It was then clipped and sewn onto the top of the hair extensions. Only two were needed as I only used to sets of extensions.

Now it’s time to do the big plait!


I clipped the second set of extensions around the bottom and also secured it with a bobble. A daisy will conveniently be placed over the join so I didn’t need to worry about making it look nice and neat. I realised this after several attempts!

Originally, I was going to have it all plaited. But it got quite thin at the bottom and I looked at adding another set of extensions but it really added to the wait and I hadn’t even added the flowers yet! So I did choose comfort instead of costume correct-ness :(


 Oh, and I also added LIGHTS! They were small micro LED lights with a small battery pack that only has two watch batteries inside. I made a little pouch under the hair to hold to battery pack and also so I could turn it on and off.
Next it was just time to add the flowers!

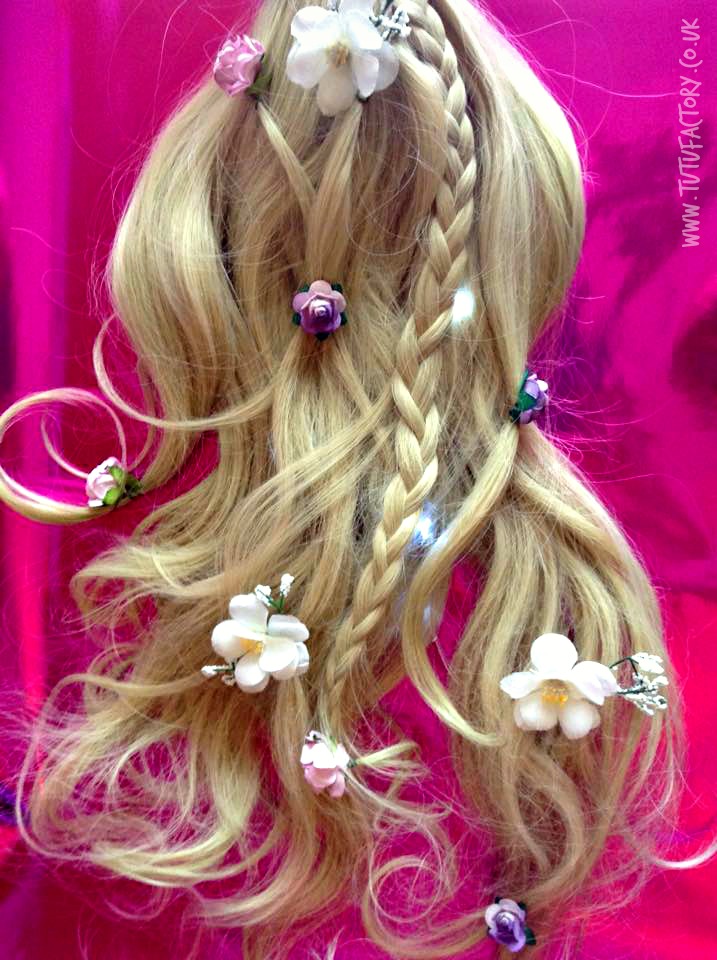


Feel free to get in touch with any questions or ideas!


Tuesday, 6 August 2013

Neon Wings - The How To


Here is a little behind the scenes look on how we make our feather wings. These ones were custom made for a customer to match her rainbow rave tutu. A lot of time and effort goes into these as each feather is glued on individually. 


Always helps to have some good music on while you work and who better to listen to than Katy Perry when you're working on rainbow wings that wouldn't look out of place in one of her concerts? (I can dream, right??)

I just stick to a standard shape for our wings right now but you could easily make these up in any shape, size or style to match your theme. I do have to watch how big I make them to keep postage costs down for my customers but if you're making them from home for yourself you could go crazy! 
It's best to draw one half of your desired shape on some card so you can then cut it out and draw around it so both sides are the same. Don't worry about having any lines on the card as you won't be able to see them once the feathers are on.


So after it's been cut out we need to make slots on each side so we can insert some straps to enable them to be worn. I've used thin elastic here so they're not too visible but I've also used elasticated sequin trim or you could use ribbon or even dress net. It's always worth checking where abouts the slots would be best placed to fit you. Could always get someone to help with this bit to get the perfect fit!!


Now, cover the straps on the back in some tape for extra hold. 


I start adding the feathers from the bottom so it's a realistic 'angel wing' look. I usually paint some glue over the space where I'll be adding the feathers as well as on the top of the feathers. Try not to get too much glue on the bottom ends of the feathers so they're quite free and still quite 3D


Now the feathers need to be layered so you can't see the card through them. As long as you've got a good base to layer the other colours on top then it will be fine.


It's up to you how much space you leave between colours/rows 


It's slow going in parts but keep going and....


ta-daa!


Rainbow Wings

                                                www.tutufactory.co.uk

                                   email me at thetutufactory@hotmail.co.uk


Saturday, 13 July 2013

Behind The Sequins


This blog is mostly a 'sneak peek' behind the scenes. Where you can see how we do what we do. As well as the amount of time and effort that we put into just one tutu! As well as our faithful side kick Rocco the Lovebird. 


Bride to be tutu set

In this post I'll be showing how we create our DELUXE Ravin' Stardust tutu set, that was requested by a customer that loved our Ravin' Stardust Tutu set but wanted glitter L plates and glitter hearts with a different veil. We're more than happy to create any of our customers ideas :)


See below the 'Tutu Story' from start to finish!


Rocco answering customer emails!


Each tutu is each individually cut once the order has been placed


Each layer has to be feathered to achieve the shape as well as the individual orange and yellow 'flashes'
Depending on size tutus can take upto 25 minutes just to be cut out into their lengths, layers and style especially if there's a bustle added on too


Well, it's not like that with Rocco....

Again depending on size a tutu can take up to anywhere from 10-15 minutes to an hour if there's lots of frills or detail!
You know when all the animals help the princesses in the Disney films? 


neon tutu

Rocco is only allowed to supervise this bit or he'd be running away with all the sequins!


Every single star sequin is glued on individually by hand all over.
Thats A LOT of stars so it takes A LOT of time!


Photos taken before glue had dried

Now for this outfit our customer didn't want our usual veil that goes with our Ravin' Stardust she wanted a straight pink veil with matching sequins and a purple glitter tiara to match the L Plates and hearts.
 And who are we to say no??


Tiara will need to dry overnight to ensure all glitter is dried to the tiara so
it doesn't all rub off when we sew it to the veil!


Matching Hen Night Veil - Custom Order


And then the parcel is off to the Post Office for a journey with the Royal Mail to arrive at your door!
Hope you've enjoyed the insight into our little studio and the makings of just one of our tutus at the Tutu Factory

Please message us at thetutufactory@hotmail.co.uk or LIKE us on Facebook :)